A Snazzy, Quick Tutorial for Salesforce and Pardot
Salesforce and Pardot are two great systems that, when combined, can make one outstanding toolset in any marketer’s workshop. But to make the educated decision to buy and deploy these platforms, you need to first have a clear plan for how you’ll use them and set some long term goals or else your ROI will tank.
There is a ton of information offered by these platforms and their evangelists, but we thought you might benefit from us taking a common scenario in digital marketing and showing you how to configure these platforms to accommodate it. This common scenario is deploying a typical landing page call to action form and then handling the submission (packed with awesome insight and control). It by no means justifies the toolset at large, but it is a common scenario that’s easily accomplished and is just plain cool to know.
Let’s paint a picture before jumping into the tutorial.
- You have a landing page template already designed and ready to deploy.
- You have a Pardot account integrated with Salesforce, along with Prospect and Contact object fields. See more on this here.
- You need to make sure that specific information is being captured on the landing page.
- A notification/triggered email needs to be sent to your Sales department upon submission so they can follow up with the user.
- We assume you have System Administrator permissions/profiles in both Pardot and Salesforce.
Now, let’s get it done.
Step 1 – Create a Salesforce Campaign
As any good marketer knows, we need to make sure we can organize and measure our efforts. In Salesforce, you will want to get introduced to Campaigns to serve that purpose. For this scenario, we will create a campaign to add users who submit the form.
Campaigns > New
Enter a name and make sure to mark it as active. Everything else is up to you on the details.
Step 2 – Create Pardot Form
Next, we are going to create a form that will allow the user to submit their information, then for Pardot to capture it and synchronize it with our Salesforce Contacts.
In your Pardot Account:
Marketing > Forms > Add Form
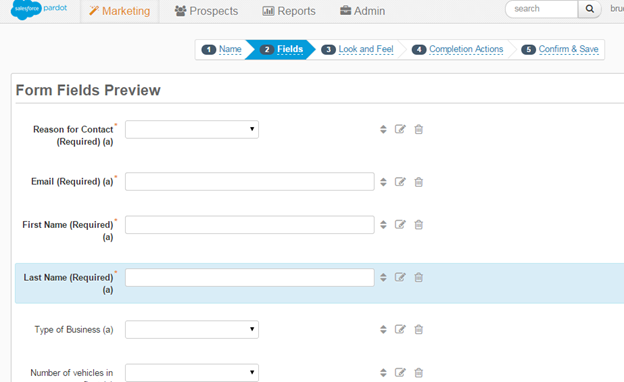
Add name, Tags (if you want), Folder (for organization’s sake) and Campaign (not to be confused with Salesforce Campaign). Then, add the fields you want to capture. These fields can tie into Salesforce and even load default data, should there be default picklist values defined. Cool.
You can even decide to show dependent fields. So, if a user selects a specific choice within a dropdown, then a series of additional fields are shown. Awesome.
Quick tip: Be sure to configure and select the layout template, ideally taking design elements from the corresponding landing page’s template and styles.
Step 2 – Add completion Actions
When finishing up the creation of the form, Pardot will offer something they call Completion Actions. This is where the magic happens and automation gets really fun.
There are plenty of options to choose from for the Completion Action for this form. You could adjust lead scores for the prospect, add to a Pardot List (close cousin of a Salesforce campaign) or even assign the prospect to a Salesforce user to follow up with.
To keep things simple here, we add a Completion Action to add the Contact to a Salesforce Campaign. Select the Campaign we created earlier.
Step 3 – Create Salesforce Workflow Rule and Email Alert
Now, to get the email notification working and send a message to you or someone else, we need to jump back into Salesforce.
Go to Setup > Create > Workflow & Approvals > Workflow Rules
We create a Workflow Rule first. We set the criteria for the Rule to filter on Campaign = Our Campaign and that a certain value entered in the form equals “Sales.”
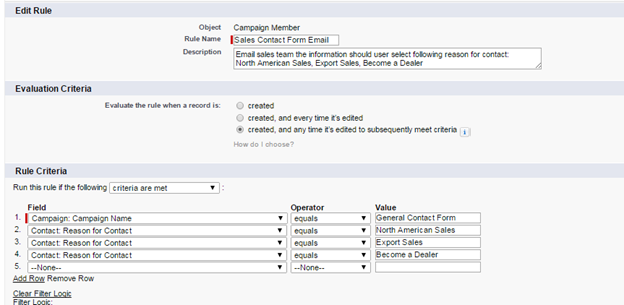
Go to Setup > Create > Workflow & Approvals > Email Alerts
Next, we create an Email Alert. Defined in this Email Alert is the Email Template used and also the recipients.

Finally, we create a Workflow Action for the Rule we created earlier that points to the Email Alert.
This complete step initiates that notification email and is always available to be edited and activated/deactivated.
Step 4 – Show Off
So now that you have a nice, automated highway of Contacts flowing into a neatly organized list for you and a notification system set up, you can start thinking about how to extend the experience and evolve it entirely. You can easily add more automation to the campaigns, more completion actions and even segmented programs within Pardot to add more relevant messaging and customer service.
Contact us today! No pressure, but we are here to help
Reach out to learn more about how thunder::tech can help your business not only succeed, but accelerate.